1. Create & Share Your Developer Account(s)
In order for the Shoutem Support Team to publish your app to the Apple App Store and/or Google Play Store, you must first create an iOS and/or Android Developer account then provide us with access to it/them.
Create & Share an iOS Developer Account
To publish your app to the Apple App Store, you’ll need your own paid organization-based iOS Developer account.
- For standard app distribution within the Apple App Store, create an iOS Developer account here: iOS Developer account
- For internal app distribution outside of the Apple App Store, create an iOS Enterprise Developer account ($299/year) here: iOS Enterprise Developer account
If you’ve already created an iOS Developer account under your personal name or email address, rather than an organization- or business-based name or email, the following may happen:
- Your app may be rejected and you will not be able to resubmit it.
- You may be able to transfer your personal account to a business account, but will need to work with the iOS Developer team directly to do so.
To invite us to your iOS developer account, follow the steps from this article.
Create & Share an Android Developer Account
A paid Google Play developer account is necessary for your app to be published in the Play Store under your own developer name. You can sign up here: Google Play Developer account.
After that, you would just need to add Shoutem to your Google Play account as an administrator by following the steps from this article.
2. Update App Info
Confirm that the basic elements of your app are ready to publish.
- Navigate to “Settings” in the far-left navigation pane, then click “App info.”

- Reset your App Name, then click “Update.”
- Set your launch screen and app icons. After successfully uploading your launch screen and app icons, those changes will be saved.

3. Add App Store Metadata
Before you can publish your app, it is important that you add Store metadata in Settings → Store metadata section.
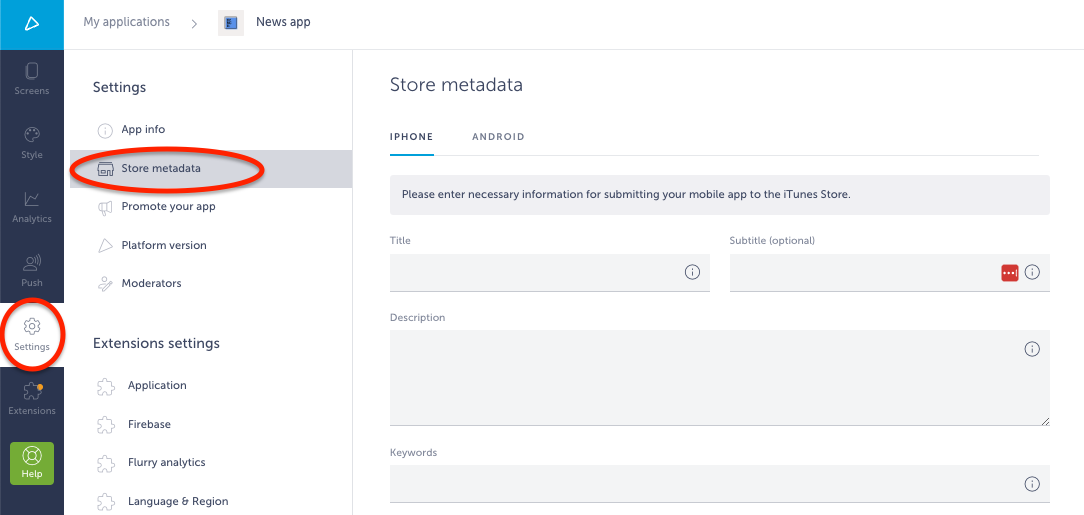
Add Metadata for Apple App Store
Under “Settings” then “Store metadata,” make sure the “iPhone” category is selected, then fill out the following metadata fields for your app:

- Title: How the app will be named in the stores. Minimum 2 characters, Maximum 30 characters.
- Subtitle: An optional summary of the app that appears below the app name. Maximum 30 characters.
- Description: An overview of the app’s purpose and functionalities. Minimum 10 characters, maximum 4,000 characters.
- Keywords: Comma-separated key terms that allow the user to find your app via search. Maximum 100 characters.
- Support URL: A support webpage or contact form where users can request support or provide feedback to the app owner. Cannot be an email address.
- Privacy Policy URL: A webpage providing the privacy policy for your app. Learn more about Privacy Policy URLs.
- Screenshots: Images of your app that accurately represent it and are visible in the app store. At least two screenshots for each display are required. Learn how to take app screenshots easily via the Disclose App.
- iOS Developer Account: The email and username (both required fields) of the developer account that this app will be published under. While the password field is optional, it must be added for automatic deploy.
- Application Price: The price (including “free”) and app’s country of origin. Selecting the country will change the currency and price selected based on current conversion rates. (i.e., an app priced at $1.99 USD may automatically convert to 2,29 €).
- Application Review Contact Information: The first name, last name, email address, and phone number of the app’s owner.
- Application category: The Primary Category (required) is that which best describes your app’s function/purpose, and is where it will be listed within the App Store. The Secondary Category (optional) provides an additional search term to help users find your app.
- Application Rating: Set frequency of specific types of images or themes within your app (ex: profanity, simulated gambling, graphic content, etc.) to help determine the targeted audience based on device and Parental Control settings. By default, these are all set to None.
After filling in all required fields, click “Save” on the bottom right.
Add Metadata for Android
Under “Settings” then “Store metadata,” make sure the “Android” category is selected, then fill out the following metadata fields for your app:

- Title: How the app will be named in the stores. Minimum 2 characters, Maximum 30 characters.
- Short Description: An introductory sentence for the app. Maximum 30 characters.
- Description: An overview of the app’s purpose and functionalities. Minimum 10 characters, maximum 4,000 characters.
- Support URL: A support webpage or contact form where users can request support or provide feedback to the app owner. Cannot be an email address.
- Privacy Policy URL: A webpage providing the privacy policy for your app. Learn more about Privacy Policy URLs.
- Artwork: A large icon of the app that will be displayed in Google Play Store.
- Feature graphic: A large display image at the top of your app listing, providing an opportunity to show off your app.
- Screenshots: Images of your app that accurately represent it and are visible in the app store. At least two screenshots are required. Learn how to take app screenshots easily via the Disclose App.
- Application Category: Where your app will be listed within the App Store.
- Application Rating: An optional setting for Low, Medium, or High Maturity for your app. Learn more about Google Play Store App Ratings.
- Application Price: The price (including “free”) that users will pay for your app.
- Google Play Android Developer Account: The Android Developer Account owner email address, console account name, and JSON key for Google Play development.
After filling in all required fields, click “Save” on the bottom right.
Important Details Regarding Your App’s Price
When it comes to the pricing of your app, you are welcome to charge whatever you’d like for your app in stores. You are presented with the option to set a price before you initiate the publishing process. All paid app transactions are between yourself and the app store, and Shoutem takes no percentage of this income whatsoever.
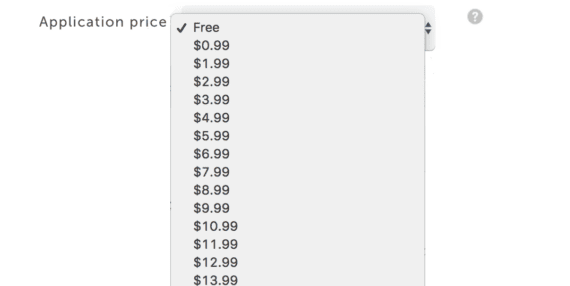
All paid apps require contractual agreements with Apple and Google Play, as well as the exchange of bank account information. Be prepared to provide this information before they allow your paid app in the stores.
As a note, you can publish your app as a paid app and then change it to be free; however, you cannot publish a free app and then change it to be paid.
3. Hit Publish!
If you’re confident in your final product, it’s time to send the app to Shoutem’s publishing team, so that we can submit your app to the app stores. You can initiate this process by clicking the blue “Publish” button in the top right corner:
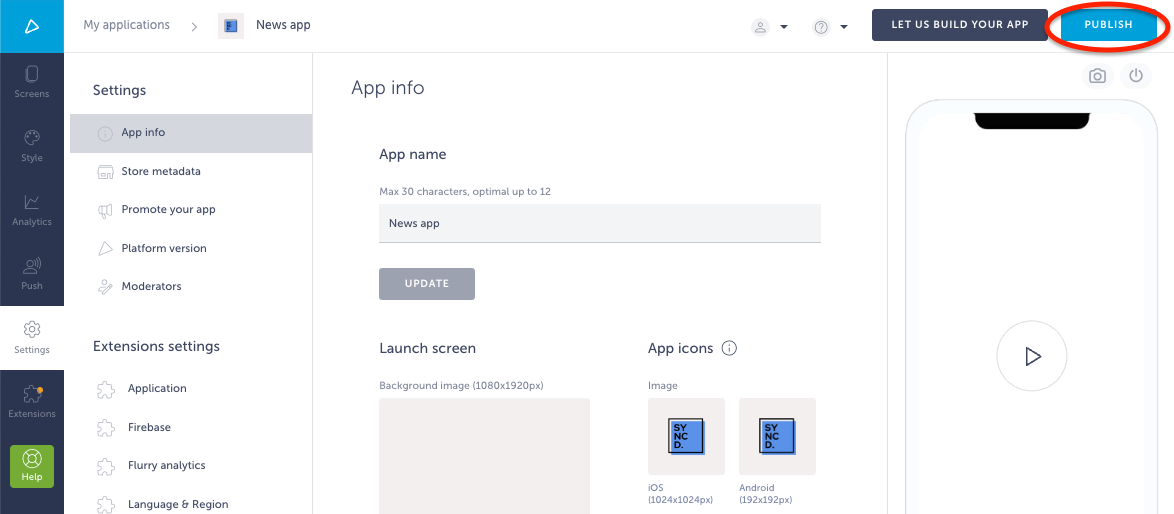
If you haven’t yet signed up for a Shoutem subscription, you will be prompted to do that first. Afterwards, click the “Publish” button again to confirm your decision.
At this point, the Shoutem Publishing Team will receive a notification to begin reviewing your app and ensure that all content and metadata are publish-ready. If all information is properly populated, the app will be published without any follow-ups, if not, we will reach out to help you fill out all necessary details prior to publishing.
Our review and publishing process takes two to seven business days. As with any other question or inquiry, you can always contact us with questions about your app, or visit our Support Center for additional tips and answers.
And finally: Congrats! We hope you enjoy your new app and appreciate you choosing Shoutem to bring your app idea to life!
